Map out your online landscape in 6 steps
Every organization wants clarity, but where do you start? In this blog, we explain step by step how to systematically map out your online landscape—from domain overview to setting priorities. No long policy memos, just practical tips.

Step 1. Collect all domains and subdomains
Together with your team, compile a list—for example, in Excel—of all domains and subdomains that are in use. These include external project websites, department pages, redirects, old campaign sites, etc. To do this, use the following tools, among others:
- The Digitoegankelijk dashboard
- Input from departments – engage in conversation to find out which pages they manage that you do not yet have insight into.
- IT data on DNS and SSL certificates – check with your IT colleagues
- Optional: the annual report
Examples of themes include: budgets, parking, civil affairs, the swimming pool, sustainability, job vacancies, social map, Notubiz, cemetery, and the participation website.
Step 2. Map out the management
If you have Excel, you can easily add the following in columns. Per site:
- Which team is responsible for management?
- Who is the owner?
- Does your organization have decision-making authority, or do you share the website and decision-making authority with another party (such as in partnerships)?
- What is the function or purpose of the site?
- Does the site have specific technical functionality, such as a reservation system or budget module? Or is it more of a themed site, such as a swimming pool or museum?
Websites without complex or unique functionality are often easier to make fully accessible, secure, and user-friendly. You can also take steps more quickly with websites over which your organization has complete decision-making authority. That often makes these sites a logical starting point.
Step 3. Categorize the raison d'être per site
For this purpose, you can use the following categories:
- A: Legally required
- B: Not legally required, but necessary for primary service provision
- C: Nice to have
- D: None of the above – it may be phased out
This classification helps you get an overview of sites that no longer offer added value. You can also determine your level of ambition for each category. For example, in the area of monitoring: you monitor A websites every quarter and B websites every six months.
You can also apply this to topics such as the frequency of accessibility audits, involving the data protection officer, purchasing conditions, mandate for changes, budget allocation, etc. Of course, you don't have to think of all this right now. But categorization is a first step, which will make this possible in the future.
Step 4. Test the technique
This relates to the performance of the site provider. Check for:
- Security. For example, you can check basic security at https://internet.nl/. This should always score 100%. If the connection appears to be insufficiently secure, immediately check whether personal data is being processed.
- Accessibility of the technology. You can get an initial insight via the inspect function (right-click on the site > Inspect > Lighthouse. Select Accessibility and analyze). This too must be 100%.
- User-friendliness. You can check this, for example, via https://validator.w3.org. Copy and paste the URL and click on "Message filtering." Are there more than 10 errors? If so, this may indicate a structural problem with the supplier.
Please note: you are dependent on your supplier in this regard. Are there any technical defects? Discuss this before proceeding. For example, you can work as hard as you like on accessible content, but if the technology is not accessible, the website will unfortunately never be accessible.
Step 5. Check the substantive preconditions
These are things you can check or add yourself:
- Is there a current accessibility statement?
- Has a recent accessibility survey been conducted?
- Is a cookie notification required and is it correct?
- Is there a valid privacy statement?
- Is the website archived?
Step 6. Analyze and determine priorities
For each site, you set priorities based on risk, impact, and opportunities for improvement:
- Geef twee punten voor alles wat technisch voldoet: twee punten voor 100% veiligheid, twee punten voor 100% op technische toegankelijkheid en twee punten voor <10 gebruikersfouten. Voldoet het niet? 0 punten.
- Give one point for each substantive precondition that is met: a valid accessibility assessment, valid declaration, correct cookie banner, etc.
- Add up the scores for each site. The sites with the lowest scores clearly indicate the level of priority.
- Get the basics right: pay particular attention to the technology. Are there sites that score extremely low on security, accessibility, and user errors? If so, it would be a shame to focus on things like a cookie banner or accessible content. Talk to the supplier first.
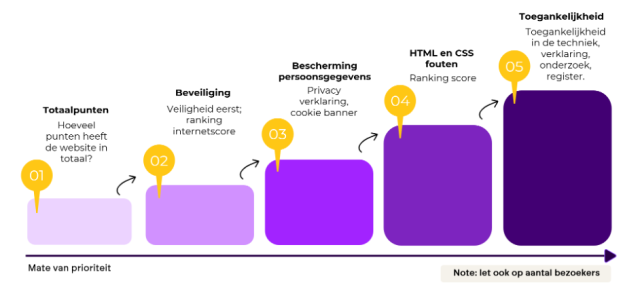
- Set priorities: what will you tackle first, and what can wait? The image on the right shows how we prioritize after mapping out the online landscape.
Important: not everything has to be done at once.
Adjust the follow-up to what is feasible for you and your team. You now know what the priorities are and where to start. The first steps have already been taken. This keeps the follow-up manageable and focused.
Get started with your online landscape?
Would you rather go through this with us or would you like us to do it for you?
Fill in this form
Read also how we helped the Municipality of Beverwijk map out their online landscape.